Instruction guide WeePie Diagonal Notification Bar Plugin
This instruction manual helps you with setting up and configuring the Weepie Diagonal Notification Bar Plugin. We’ve tried to make a selection for some points you may need help with. If something isn’t clear, missing or incorrect, feel free to contact us.
Table of contents
A. How to install the Plugin
B. How to update the Plugin
C. How to use the plugin on another website
D. How to use the WPML Plugin to translate the texts in the WeePie Diagonal Notification Bar Plugin
E. How to translate admin dashboard text strings using a .pot file
A. How to install the Plugin
- Register your Envato purchase code at weepie-plugins.com/register-envato-purchase-code/ (an email will be sent to you with your WeePie code).
- Unzip the download file and upload the weepie-framework and weepie-diagonal-notification-bar folder to the /wp-content/plugins/ directory.
Alternative through your WordPress admin: Zip the unzipped weepie-framework.zip and weepie-diagonal-notification-bar.zip folder separately and upload them both through your WordPress admin panel (Plugins > Add new). - Activate the WeePie Framework Plugin through the ‘Plugins’ menu in WordPress.
- Activate the WeePie Diagonal Notification Bar Plugin through the ‘Plugins’ menu in WordPress (IMPORTANT: the WeePie Framework Plugin must be activated BEFORE activating the WeePie Diagonal Notification Bar Plugin).
- Validate your Envato purchase code by clicking Validate on the ‘Plugins’ menu (or in the visible admin notice) and enter your purchase code and WeePie code in the popup form click on VALIDATE!.
- Go to the WeePie Diagonal Notification Bar Settings page in your Dashboard and adjust the settings to your needs.
- Enable the Plugin after all settings have been configured properly.
B. How to update the Plugin
- Deactivate the WeePie Diagonal Notification Bar Plugin
- Deactivate the WeePie Framework Plugin
- Remove the OLD plugin files: WeePie Framework and WeePie Diagonal Notification Bar
- Upload the new files: WeePie Framework and WeePie Diagonal Notification Bar
- Refresh the WordPress Plugins page
- Activate the WeePie Framework Plugin
- Activate the WeePie Diagonal Notification Bar Plugin
C. How to use the WeePie Diagonal Notification Bar Plugin on another website
- Go to your Plugins page in your WordPress admin environment
- Click on the red Unvalidate link under WeePie Diagonal Notification Bar in your plugins list
- Register your new website URL on the Register purchase code page on weepie-plugins.com
- Install, activate and validate the WeePie Diagonal Notification Bar Plugin on your new website
D. How to use the WPML Plugin to translate the texts in the WeePie Diagonal Notification Bar Plugin
Note: By default, the language is set to English. To translate, you can change the English texts into your selected language.
- Click on the language you want to add in the WordPress bar on top:
- Translate the default English texts into your selected language
- Select the Status “Enabled” on the General settings tab. Your translation of the WeePie Diagonal Notification Bar Plugin is active now!
Note: If you activate the WPML Multilingual Plugin or when you add a new language when the WeePie Diagonal Notification Bar Plugin is already installed, you have to reset the WeePie Diagonal Notification Bar Plugin.
E. How to translate admin dashboard text strings using a .pot file
1. Open Poedit and go to “File” > “New catalogue from POT file…“:
2. Select the file “wpiecnyb.pot”:
3. Enter your language in the field “Language” (For example the Italian language “it_IT”) and click on “OK“:
4. Save the file by clicking on the ‘Save‘ button:
5. Translate the strings:
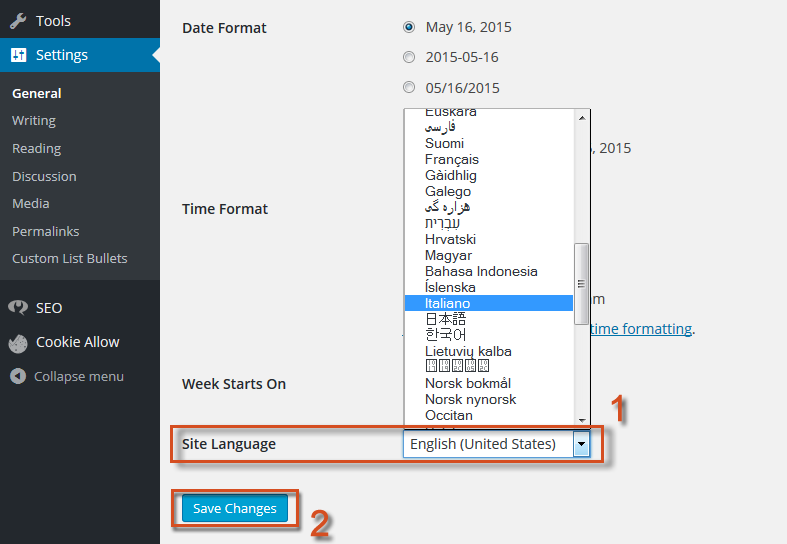
6. Select your language under “Settings” > “General” > “Site Language” and click on “Save Changes“:

You’ve translated the admin dashboard text strings of the WeePie Diagonal Notification Bar Plugin!